Introduction
Wubba lubba dub dub! Me again, been quite some time. Was busy, and now with university starting again, I will be even more busy. Not an easy task to work and study at the same time. But I am trying my best. The assignment for this week was to write a simple program in RAG. I had a meeting with my supervisor and he said that it would be a good idea to write a simple version of my bachelors. He called it the twitter / youtube tutorial of custom RAG. I like the idea of it being the famous Hello World! equivalent. So this is what I am going to write about. I won’t do the twitter tutorial, as I will rather read longer and a better explained tutorial. Btw the renaming of twitter to X is reaaaly bad, nobody is calling it that. I mean, oof on the marketing side.
The tutorial search
It went pretty easy as there is plenty of resources on the internet, although most of the tutorials were short and not very well explained. The big issue was that they are using these APIs, which is a no go for me for privacy reasons. The GUIs are even worse, for the same reassons. But eventually I have found the one that I was looking for. Wuala the tutorial. It is decently sized and well explained. The code is quite simple and the power of python is extreme. A lot of people dislike python, in university scene, but I think it is a great language. It is so powerful with the amount of lines you have to write. So lets butcher the code and see what it does.
The menu
- Blog post / private data
- Storing data
- Initializing an LLM
- Looking in the pantry
- Serving the dish
First thing on the menu is the blog post / private data. The tutorial in question, loads a document particularly a blog about RAG. I will change it a bit as I want to load firms data from confluence. That means I will use an API to grab some of the data to make it only a test. Hopefully around 5 documents will be enought. One question that occured while creating this was: If the amount of data that I will store isn’t too big for it to respond in a reasonable time. I will have to see how it goes. Hopefully it will be fine.
Lets move on to the next appetizer. Storing data.
from langchain_text_splitters import RecursiveCharacterTextSplitter
text_splitter = RecursiveCharacterTextSplitter(chunk_size=500, chunk_overlap=0)all_splits = text_splitter.split_documents(data)
from langchain_chroma import Chromafrom langchain_ollama import OllamaEmbeddings
local_embeddings = OllamaEmbeddings(model="nomic-embed-text")vectorstore = Chroma.from_documents(documents=all_splits, embedding=local_embeddings)
This part is quite simple as was the whole tutorial. They use the LangChain framework (really unexpected as the article is from LangChain website) to recursively create chunks of data and eventually store it. The settings for the splitting are as simple as it can get. It is one of the areas where I will have to do some research and testing in the future to see what works the best. After that the code uses the Ollama embeddings to create the vectors. The model is called nomic-embed-text which needs to be pulled first for us to use it. You can use this command to pull it: ollama pull nomic-embed-text. There are multiple models, which I will go trought and test them out to experiment, but thats for later this was just to see how good it works out of the box. If you want to see more models now you can check this ollama website or browse here. After that the code uses the Chroma to store the vectors. As with the embeddings, there are multiple paths to choose from and I will test them when the time is right. I will now continue with the menu.
The main course is the initialization of the LLM in combination with the retrieval of the data. This is what I mean by the power of python.
docs = vectorstore.similarity_search(question)
from langchain_ollama import ChatOllama
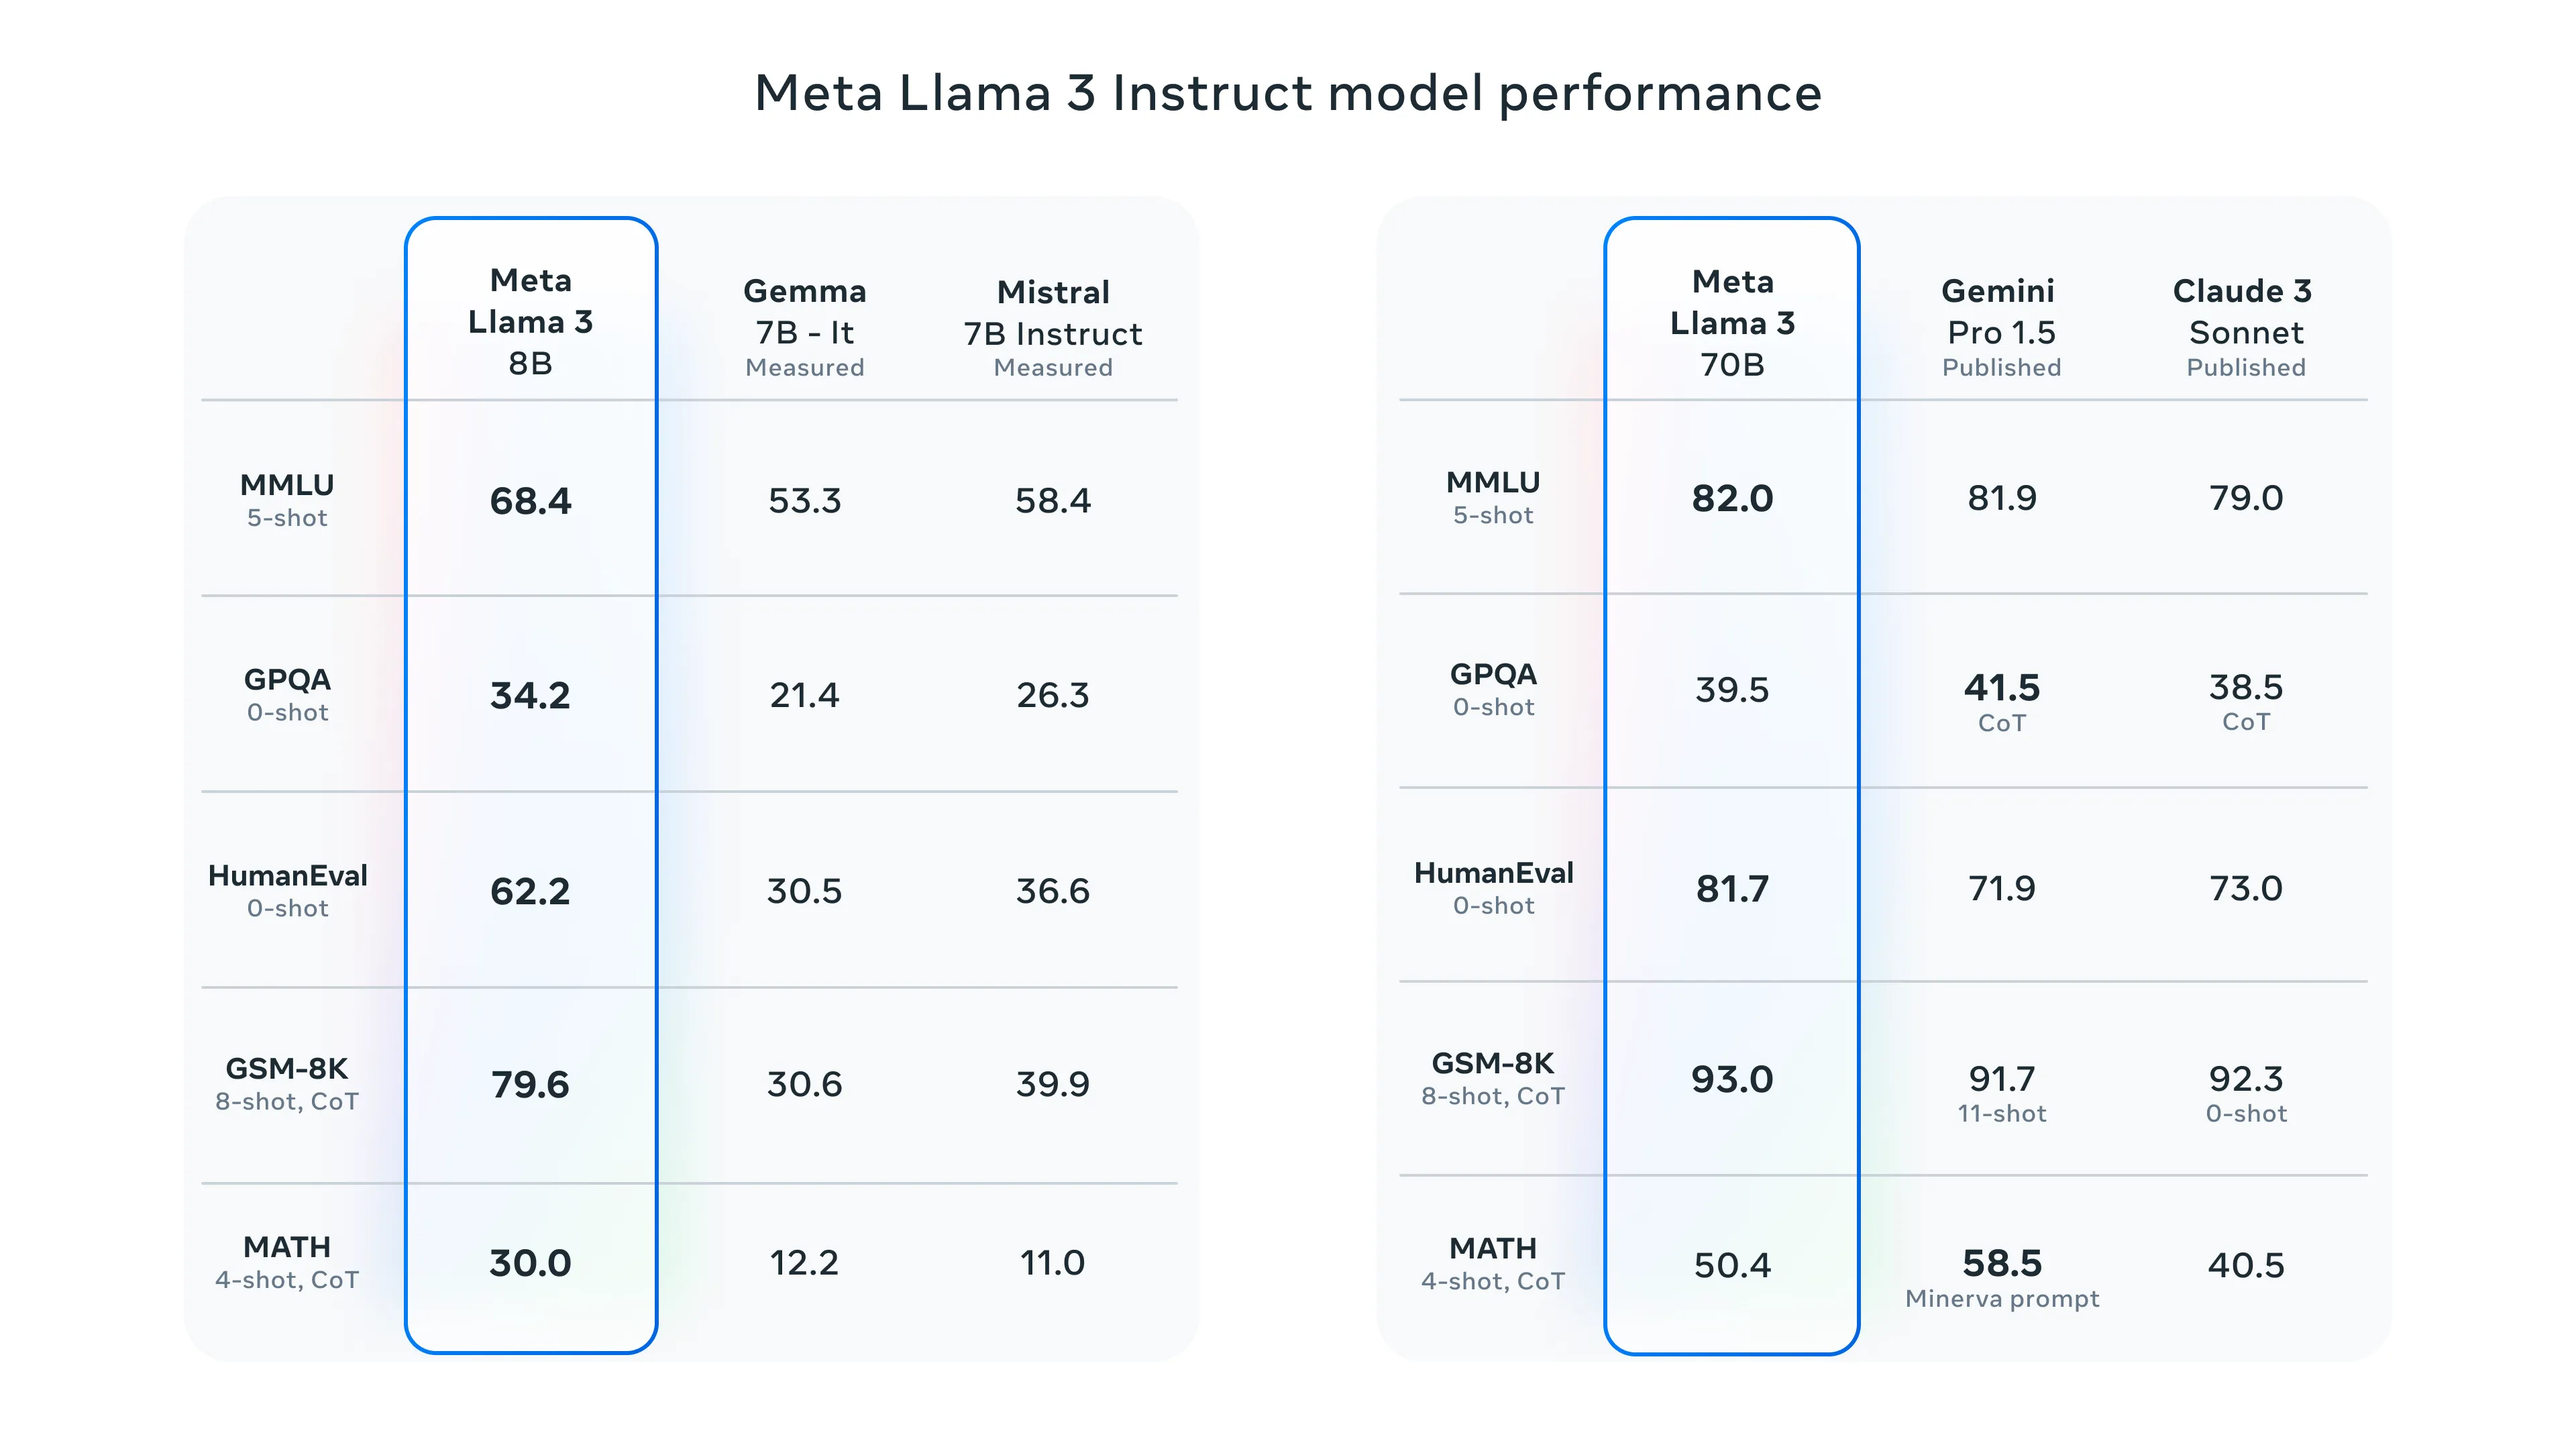
model = ChatOllama( model="llama3.1:8b",)Two and a half lines of code and you have a working LLM model and simularity search. We are using the Llama 3 8B as the core. The model is 8B in size, which means we can run it on most of modern personal laptops. As I am limited by the hardware I will implement my solution on models only around size 8B. The Llama 70B benchmarks were quite impressive, but that is off the table for me. I will try to implement it with misntral 7B which is in our “weight class”.
Here are some benchmarks for LLama 3 models:
Code for the next section.
RAG_TEMPLATE = """You are an assistant for question-answering tasks. Use the following pieces of retrieved context to answer the question. If you don't know the answer, just say that you don't know. Use three sentences maximum and keep the answer concise.
<context>{context}</context>
Answer the following question:
{question}"""
def format_docs(docs):    return "\n\n".join(doc.page_content for doc in docs)
rag_prompt = ChatPromptTemplate.from_template(RAG_TEMPLATE)retriever = vectorstore.as_retriever()
qa_chain = (    {"context": retriever | format_docs, "question": RunnablePassthrough()}    | rag_prompt    | model    | StrOutputParser())
Looking into the pantry part is the most complex part of the tutorial. It is about defining the template that the LLM will use to answer the questions. Our template ensures that the assistant’s responses are concise and within three sentences. We then use ChatPromptTemplate.from_template method, which takes the RAG_TEMPLATE and converts it into a prompt template object. After that we initialize the retriever. Finally, the qa_chain is defined as a sequence of operations. Basically saying that the context will be retrieved and formatted using the retriever and format_docs function, while the question will be passed through unchanged using the RunnablePassthrough class. The chain then pipes the formatted context and question through the rag_prompt, a language model, and finally parses the output.
After that it is the crem de la crem, just asking the model a question and getting the answer. The end of this tutorial and also the menu.
Next up
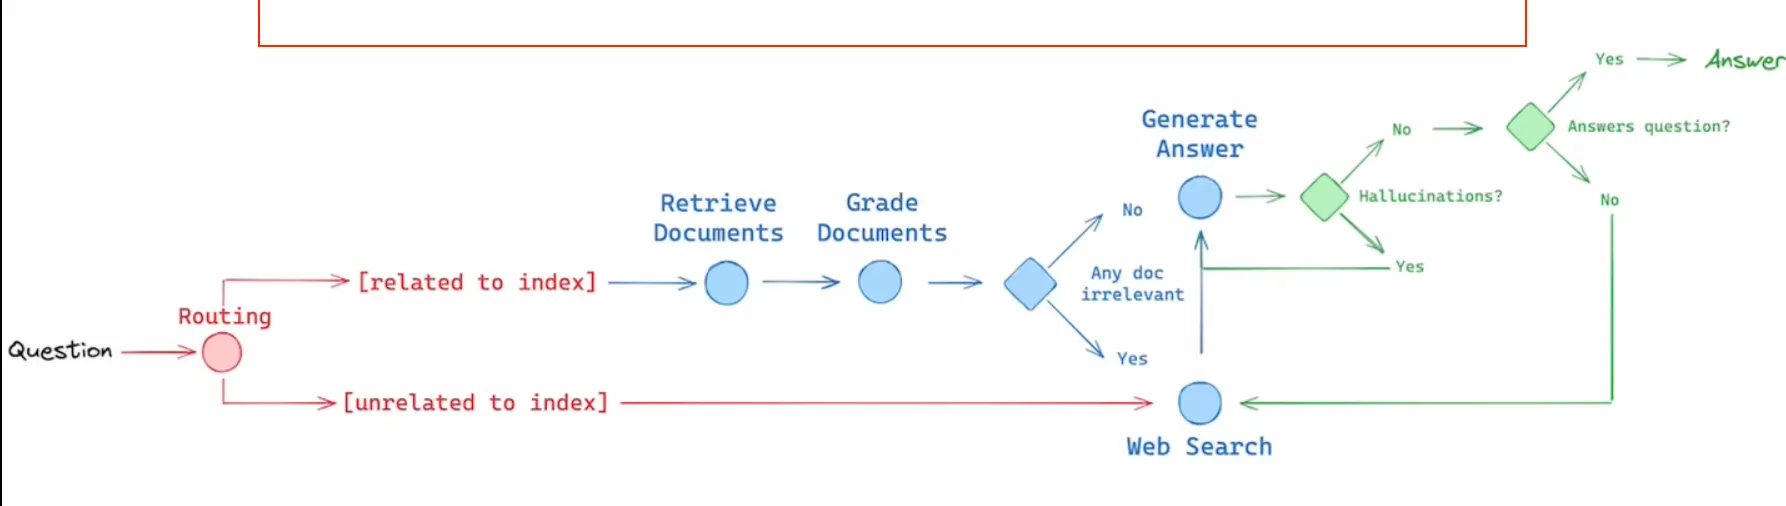
I have also checked out the material that is in the end of the tutorial. There is this quite short video, which I have checked out. I discovered something new and exciting that I will definitely want to implement into my solution. As you can see in the image bellow, there are these three concepts that are used in the diagram.
- Routing - Route the question to different retrieval approaches.
- Fallback - Fall back to a web search if the retrieval fails.
- Self-correction - Fixing the answer if hallucination occurs or do not answer at all.
As in our case the information that is relevant for us is private, that means the relevant info is only in the database that we will create, so the routing / fallback will not be needed. But the self-correction is something that I will definitely want to implement. I think it will be a great addition to the solution. On a second thought, the routing could be useful in a sense that we do not know if our user will ask specific questions or general ones. So it may come in handy. I will have to think about it.
I also learned that the ollama has a specific promt format (obviously) that I will have to pay more attention to. That was it for this video. This guide was next. Will read it whole but this particular concent of HyDE made an impression on me. Putting it on my visual TODO board that does not exist, but definitely should. To read the paper on it. For now I will finish here and continue in another post very soon.